What is the Vyatta ?
The free community Vyatta Core software(VC) is an open source network operating system providing advanced IPv4 and IPv6 routing, stateful firewalling, IPSec and SSL OpenVPN, intrusion prevention, and more. When you add Vyatta to a standard x86 hardware system, you can create an enterprise grade network appliance that easily scales from DSL to 10Gbps. Vyatta is also optimized to run in VMware, Citrix XenServer, Xen, KVM, and other hypervisors, providing networking and security services to virtual machines and cloud computing environments. Vyatta has been downloaded over 600,000 times, has a community of hundreds of thousands of registered users and counts dozens of fortune 500 businesses among its commercial customers.
What does Vyatta stand for?
The word “vyatta” (pronounced vee-AH-tah) is ancient Sanskrit and means “open.”
In this tutorial I would like to show install Vyatta 6.4 Core Virtualization ISO on Qemu image and run it from GNS3.
1. Download Vyatta Core 6.4 Virtualization iso (you will be probably ask to fill short questionnaire)
2. Create Qemu qcow2 image
/usr/bin/qemu-img create -f qcow2 ./vyatta6.4vc.img 1G
3. Boot Qemu image with Vyatta 6.3 LiveCD
/usr/local/bin/qemu-system-i386 -boot d vyatta6.4vc.img -cdrom vyatta-livecd_VC6.4-2012.04.30_i386.iso -m 1024
login/password: vyatta/vyatta
4/ Make a serial console to be a default option in the boot menu
Basically these are the options presented in the Grub boot menu:
Vyatta VC6.4-2012.04.30 (KVM console)
Vyatta VC6.4-2012.04.30 (Serial console)
Lost password change VC6.4-2012.04.30 (KVM console)
Lost password change VC6.4-2012.04.30 (Serial console)
Vyatta VC6.4-2012.04.30 (Serial console)
Lost password change VC6.4-2012.04.30 (KVM console)
Lost password change VC6.4-2012.04.30 (Serial console)
According to the words of developer:
As we install Vyatta on qemu image, the first default option will always be kvm console.Which console to use was traditionally defined automatically during install, by vyatta-grub-setup, based on which console the user was logged in on. i.e. if you install while on a serial console, your default console in grub would be the serial one.
vyatta@vyatta:~$ sudo su
Edit the file /opt/vyatta/sbin/vyatta-grub-setup and find a line starting with default-console=0. Change it to 1 and save the file.
The change in the script
vyatta-grub-setup above does not help us much as the script is started
only during install. Nevertheless, we can change directly a parameter “set default=0” in /boot/grub/grub.cfg to 1 in order to boot with serial console option.
5. Install Live CD
To install Live CD to Qemu image enter run an installation script.
vyatta@vyatta:~$ install system
The wizard is opened and you are going to through installation process:
Would you like to continue? (Yes/No) [YES]: Enter
Partition (Auto/Union/Parted/Skip) [Auto]: Enter
Install the image on? [sda]: Enter
This will destroy all data on /dev/sda.
Continue? (Yes/No) [No]: Yes
How big of root partition should I create? (1000MB – 1074MB) [1074]MB: Enter
I found the following configuration files
/opt/vyatta/etc/config/config.boot
Which one should I copy to sda? [/opt/vyatta/etc/config/config.boot] Enter
Enter password for administrator account
Enter vyatta password: vyatta
Retype vyatta password: vyatta
Which drive should GRUB modify the boot partition on? [sda]: Enter
Done!
Enter password for administrator account
Enter vyatta password: vyatta
Retype vyatta password: vyatta
Which drive should GRUB modify the boot partition on? [sda]: Enter
Done!
You have successfully installed Vyatta.
6. Adapt Vyatta NIC to the GNS3 Qemuwrapper behaviour
GNS3 qemuwrapper script runs an Qemu
image with random MAC address generated for Ethernet interface. Next
time the Qemu image is started a new MAC address is generated for the
same interface. Vyatta is programmed to save MAC address of existing
Ethernet interfaces. If the new MAC address of existing interface is
generated, Vyatta preserves the interface with an original MAC address
and create a completely new interface with the new MAC address.
For this reason, every time an Qemu instance is restarted the number of interfaces is doubled.
a) Remove vyatta_net_name script (root password needed)
First, switch to the superuser account with sudo su
or set a superuser password.
vyatta@vyatta# set system login user root authentication plaintext-password root
vyatta@vyatta# commit
vyatta@vyatta# save
vyatta@vyatta# exit
vyatta@vyatta:~$ sudo su
root@vyatta:/home/vyatta# cd /lib/udev/
root@vyatta:/home/vyatta# mv ./vyatta_net_name ./vyatta_net_name_backup
Add the following line to /lib/udev/rules.d/75-persistent-net-generator.rules
ENV{MATCHADDR}==”0*”, ENV{MATCHADDR}=”"
The line adds Ethernet interfaces whose
MAC addresses begin with HEX number 0 to the list of Ethernet
interfaces which will be ignored even their MAC address has been
changed.
7. Setup GNS3 for Vyatta qemu image
- Start GNS3
- Edit-> Preferences-> Qemu-> Qemu Host
Set settings according to picture:

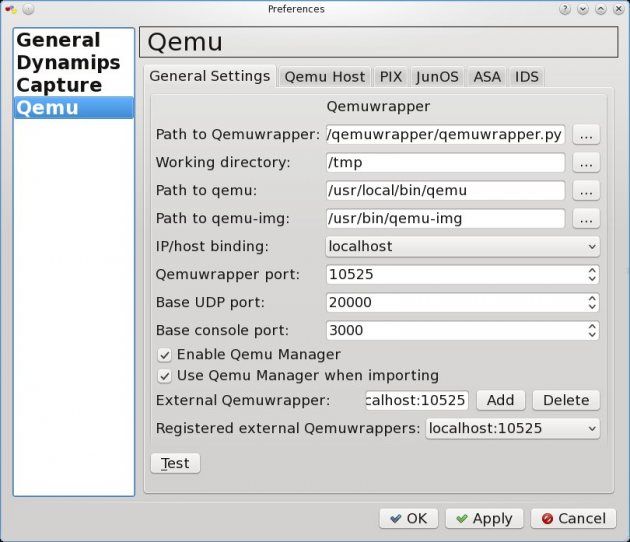
You need also set Qemu general settings like path to qemu, qemu-img and qemuwrapper.
- Edit-> Preferences-> Qemu-> General Settings
Check the picture below for details:
Login to Vyatta:
login/password: vyatta/vyatta
8. Conclusion
I’ve created a video to prove
functionality of Yvatta 6.4 on Qemu image. In this video three Vyatta
Qemu instances are running RIP routing protocol.
login/pass: vyatta/vyatta
Note:
If you use Linux with non-patched Qemu, do not forget to patch, compile
and install Qemu for udp tunnels and multicast. The tutorial is
available here:
INFO: http://brezular.wordpress.com/2010/09/25/how-to-install/